

SSJ Fig Day includes one fabulous cookie! Here’s my recipe for Italian Cuccudati. These “little bracelets” are the luxurious and voluptuous inspo for your grocery store “Newton.” You’ll need a food processor for at least the fig portion of this recipe. And if, like me, you’ve opted to save space in the kitchen by purchasing a food processor with a smaller bowl, you can divide both the fig and dough making steps into batches. These are a Christmas cookie where I come from, but you can switch the red and green nonpareils our for rainbow sprinkles and enjoy them year round. Haven’t had one before? Be prepared to be wowed by yet another Nonna cookie. #teamNonna

Cuccidati
These Italian fig cookies are the bigger better tastier inspo "Newtons" you already couldn't get enough of as a kid.
Servings: 32 to 36
Ingredients
Filling
- 14 oz [or 410 grams] dried figs [Almost all of a bag of dried mission figs labelled 454 grams minus 3]
- 1 cup [or 125 grams] pitted medjool dates [torn in half to ensure the pits have, indeed been removed]
- 1 cup [or 100] grams sliced blanched almonds
- 1 cup [or 100] grams chopped walnuts
- ½ cup honey [or a mix of ¼ cup honey and ¼ cup either orange marmalade or apricot jam]
- ¼ cup brandy, liqueur, marsala, or orange juice [I used Courvoisier]
- 1 tbs orange zest [from 1 large orange]
- 1 tsp cinnamon
Dough
- 3¼ cups all purpose flour
- ¾ cup sugar
- 2 tsp baking powder
- ½ tsp salt
- 2 large eggs
- 1 cup chilled butter, cubed
Glaze
- 1½ cups icing sugar
- 3 tbs milk, half and half, or lemon juice [lemon juice will impart a slight yellow colour to the icing]
- sprinkles [shown here: red and green nonpareils]
- food colouring [OPTIONAL, and not shown here]
Instructions
Filling
- OPTIONAL: Toast the nuts by preheating an oven to 350℉. Line a pan with parchment. Spread the sliced almonds and chopped pecans on the pan. Toast for 7-9 minutes, until fragrant and just beginning to brown. Remove from oven.
- FOR MOST BAKES: Unless your dried figs are very pliant, soak the figs in boiling water for 10 minutes before patting dry with a towel.
- Remove the stems from the figs and slice in half.
- If you have a small food processor, you will want to do the following in two batches, by dividing the ingredients roughly in half.
- In the bowl of a food processor fitted with a blade, pulse the figs, dates, and nuts to a fine dice.
- Add the remaining filling ingredients and pulse until the mixture forms a paste.
- Place the paste in a bowl or container, cover, and refrigerate for at least one hour, and up to 24.

Dough
- If you have a small food processor, you will want to do the following in two batches by dividing the ingredients roughly in half. See Notes for alternatives.
- In the bowl of a food processor fitted with either a dough blade or a regular blade, combine the dry ingredients.
- Add the butter, first, pulsing with the dry ingredients until small seeds of dough are formed.
- Then, add the eggs, until a dough forms.
- Pour the dough onto a lightly floured surface, kneading into a large ball if necessary. [You may notice that the processed dough still feels a bit "sugary" or "grainy." This is fine for now.]
- Divide the dough into four equal balls, press them into discs, wrap, and refrigerate for at least 1 hour and up to 24.

Assembly and Baking
- Preheat the oven to 350℉ and line two baking sheets with parchment or silpats.
- Remove one or two discs of dough from the refrigerator and allow to sit for approximately 10-15 minutes, until they become malleable.
- Fill a small bowl with water and set to one side of your work surface.
- On a well-floured surface lined with parchment, wax paper, or a silpat/rolling mat, work the dough into a ball. If the dough previously felt "grainy" with sugar, now is the time to make it a bit more malleable by kneading it gently with floured hands.
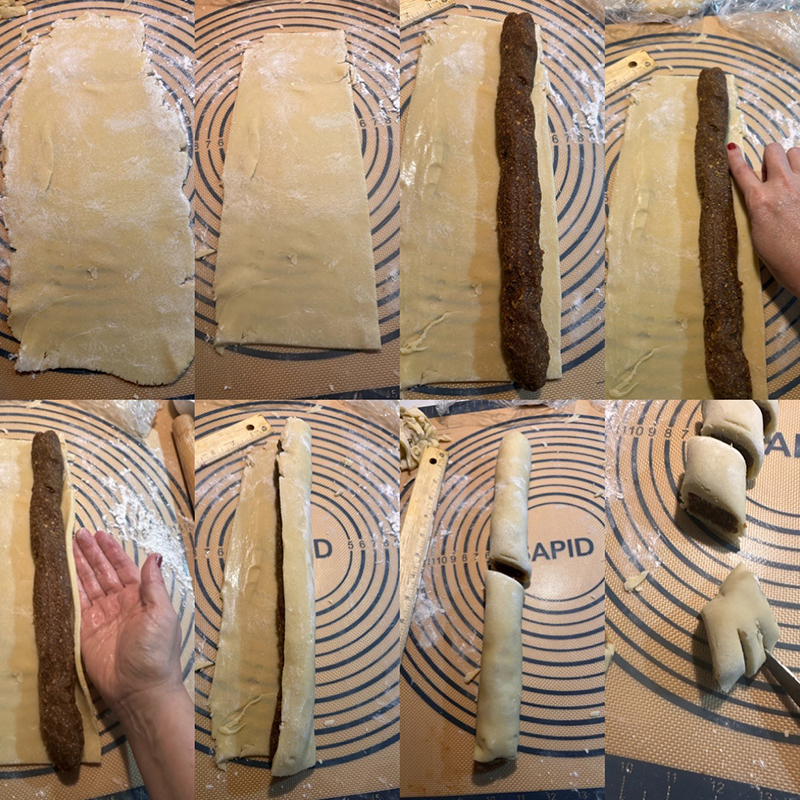
- On that same well-floured surface, with a well-floured rolling pin, roll the ball of dough into a large rectangle, 5 inches wide by 14 inches long. It's okay if you end up working the dough a bit, or taking a few attempts. The dough is forgiving.
- Use a butter knife or bench scraper to slice the formed dough into a perfect rectangle.
- Remove the filling from the refrigerator and divide into 4 equal sections while still in its container.
- On a separate or adjacent clean surface [such as a countertop, cutting board, parchment, wax paper, or silpat/rolling mat] take one of the 4 sections of filling and roll it by hand, working it into a long even cylinder approximately 14 inches long.
- Place the cylinder of filling onto the rectangle of dough, approximately ½-inch from the edge of one of the 14-inch long sides.
- Dip one or two fingers into the water and wet the four edges of the dough.
- Use a scraper or the edges of your palms to nudge the visible ½-inch of dough along the 14inch log of filling up against the log.
- From this raised side or dough, roll the dough over the cylinder of filling, so the filling becomes completely enclosed within the dough, and the dough forms a log. The dough will definitely be overlapped at the bottom of this cookie log. [The fully formed log is depicted as already sliced in two in the graphic below.]
- Using a knife or a bench scraper, divide the log into 8 or 9 pieces. [I tend to divide the dough it in half, then into fourths, then into eighths.] You may slice your cookies at a 45° angle or straight across.
- If desired, use a knife or the scraper's edge to make two evenly spaced slits on one long side of each cookie, and one evenly spaced slit on the other side of each cookie.

- Place the cuccidati on a prepared tray and bake for approximately 18 minutes, until just beginning to brown on top and with a lovely light brown base when lifted to view.
- Leave the cuccidati on the pan for 3-5 minutes before sliding off the parchment and transferring to a wire rack to cool.
- Repeat the process with the three remaining portions of dough and filling.
- Once cool, unglazed cuccidati may be packaged and frozen for up to six months.

Glaze
- Whisk the icing sugar and milk until a thick glaze forms. And, if desired, tint the glaze with food colouring.
- Place a piece of parchment beneath your wire racks and with a spoon or fork, drizzle the cuccidati with the thick glaze.
- Decorate the glazed cuccidati with coloured sprinkles before the glaze sets.
- Allow the cookies to sit for at least 10 minutes or until the glaze is set, before plating or packing into your holiday cookie tins.
Notes

As an alternative to using the food processor for the dough you may: A] Use a pastry blender and then a spatula and work the dough in a bowl, following the same order of operations [dry ingredients, butter, eggs] as above. or B] Use a stand mixer, creaming the butter and sugar first, before adding eggs, and then the dry ingredients.
Nonna says, “fidarsi del processo!”


PREGO!
Leave a Reply