DIY Sauna Hats [Free Pattern]

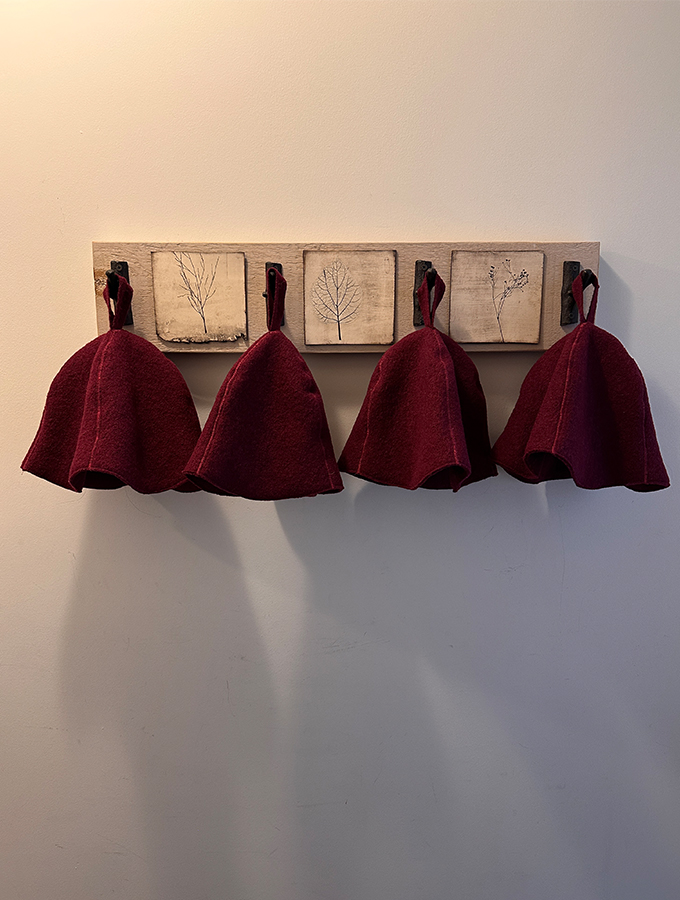
Before meeting up with dear friends for our annual ladies weekend, I wanted to make sauna hats for our day at the spa. We love a good sauna. Make it an aufguss ritual and we’re relaxed enough to return to civilization for another few months. A thick, boiled wool sauna hat will keep you cooler in warm temperatures and warmer in cold temps, helping you sustain your sauna sweat sesh while keeping you cozy once you’ve gone out in the winter weather to settle into rest mode. Of course, don’t wear it into your post-sauna cold plunge unless you only plan on dipping up to your shoulders. That’s why there’s a hanging loop on top of the hat.

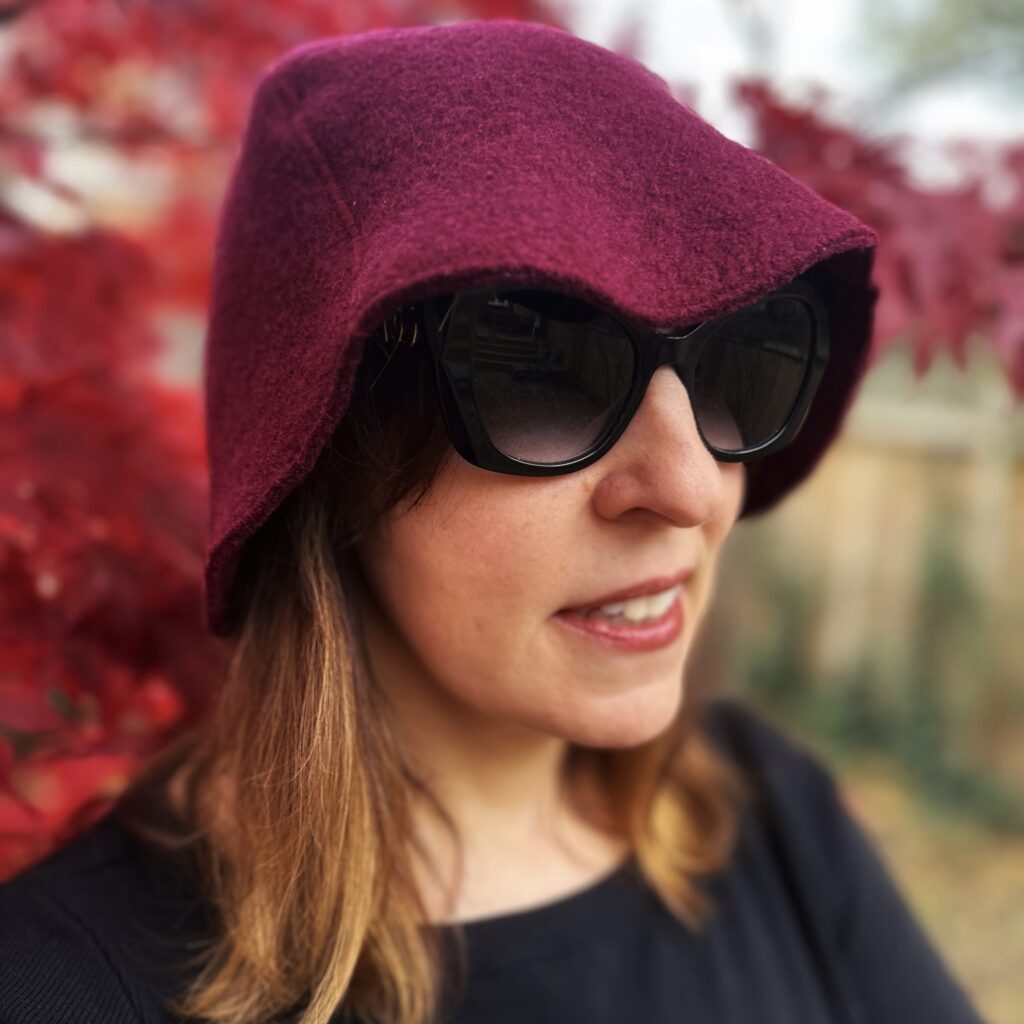
Initially, I looked at a few affordable ready-made options online, but the quality was not there. So, I decided I would wing it and make something much nicer for the squad. I couldn’t find any free sauna hat patterns online, so I decided to create a pattern for a four-piece, bell-shaped sauna hat, myself. I wanted an easy fit that could be pulled down slightly, when desired, to cover the eyes for ultimate privacy in the sauna or when relaxing on a hammock or chair (as in the photo of my gorgeous friend, below). If you just want to stop and admire the hats, you can do so now. Keep scrolling for the technical details and the free pattern template.

Once I had a pattern prototyped, I traced it onto a thin piece of template plastic left over from one of the fabulous quilting classes I took from Johanna Masko at The Workroom. Of course, you could easily cut out something similar from a clear plastic dollar-store placemat or just stick with a piece of paper to trace your pieces on the fabric with some chalk. I also cut a 1-by-4-inch rectangular hanging loop for each chapeau.

I made my sauna hats from two layers of a lovely Mulberry boiled wool I purchased from my local Fabric Spark. It takes approximately 1/3 yard of a wide-width boiled wool to make each double-layered boiled wool hat. [You could create a single layered hat by using a thicker felted wool, but a) I couldn’t find any, and b) I find it too scratchy.] Though, with a little creative pattern placement, I really only needed one yard of this particular fabric to make four double-layered sauna hats.

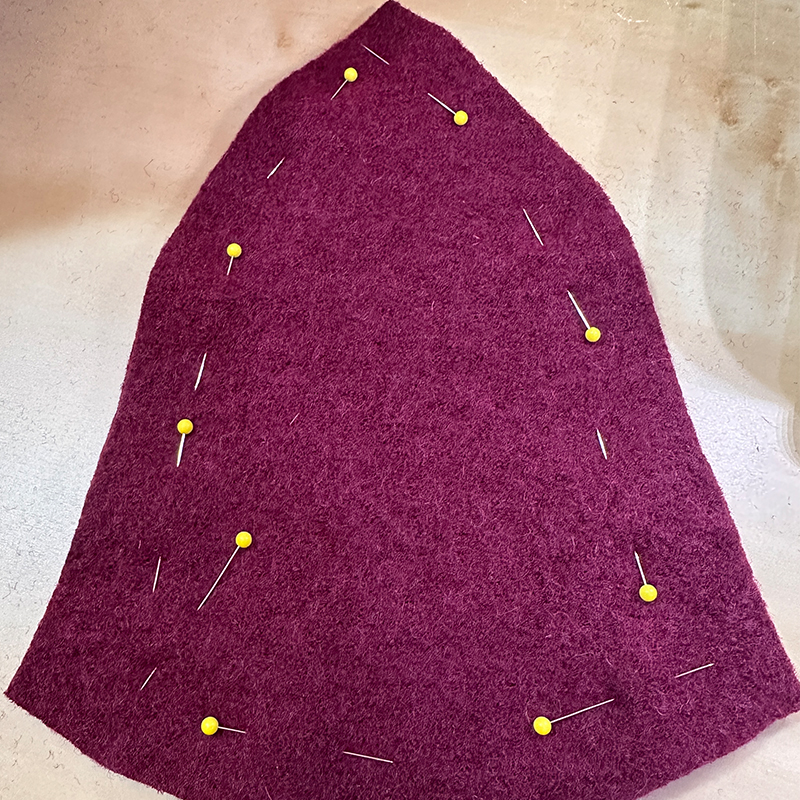
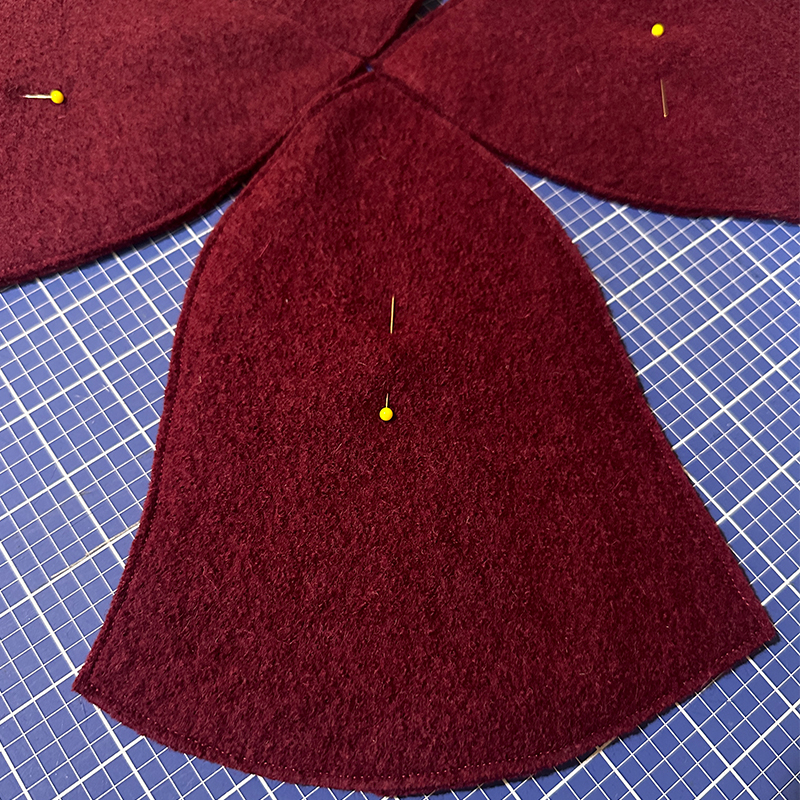
I found one side of the boiled wool slightly smoother than the other, so I used this smoother side as my “wrong side,” the part that would be touching the head. I cut 8 bell pieces, to make 4 pairs, sewing them together around the full shape of the bell with a straight stitch about 1/16- to 1/8-inch from the edges. Notably, rather than sewing each pair of bells with the “wrong” sides together, I sewed them back to front, so that I ended up with a double-layered bell with a “right side” on top and a “wrong side” on bottom.

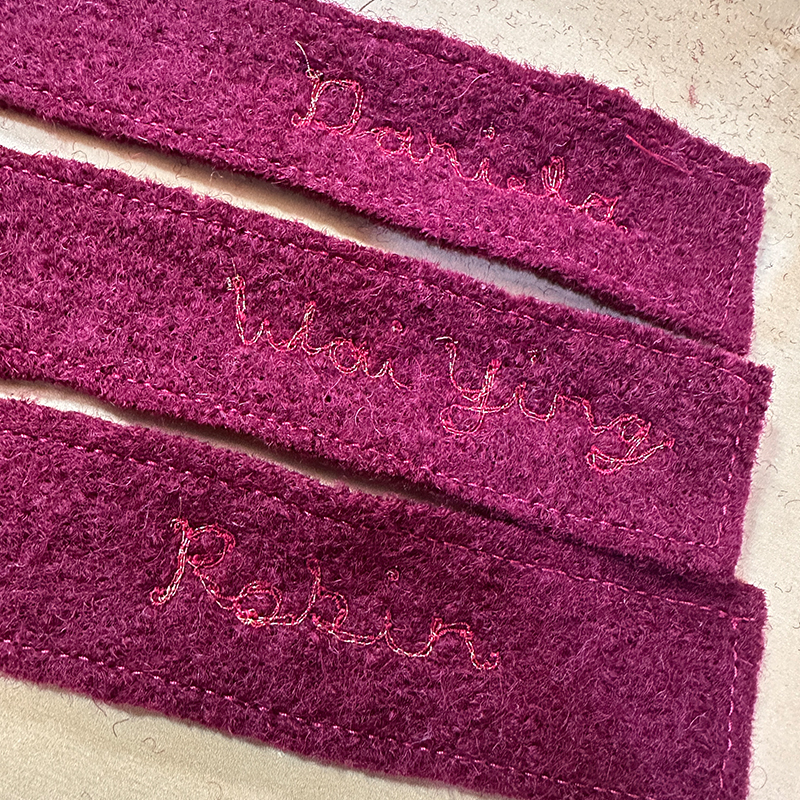
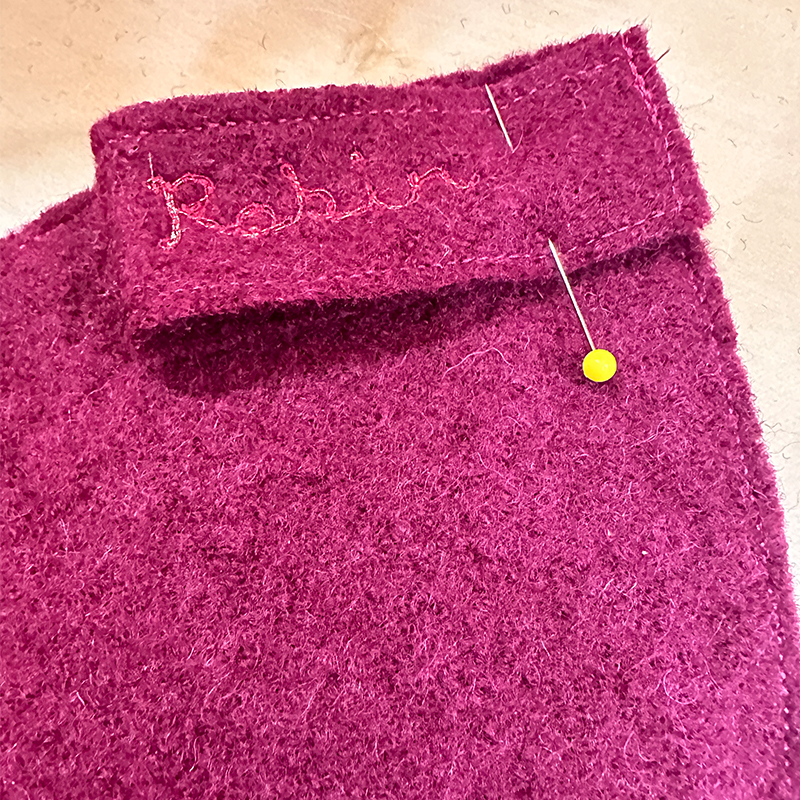
I also edge-stitched at 1/16- to 1/8-inch along the 4-inch sides of the single-layer hanging loop. [And I added an additional flourish by switching to my free motion embroidery foot with the feed-dogs down to embroider each lady’s name in gold polyester thread on the loop]. Then, I formed the loop and attached it near the top of my first bell piece with a straight stitch.

Using good old polyester thread, a ballpoint needle, and the walking foot on my beloved Bernina, I zigzagged each of the four double-layered bell pieces together from the top of the hat to the bottom [using a 5.5mm wide and 1.2mm long zigzag stitch].

I think I exceeded my own expectations. The ladies, likewise, were really happy with their gifts. And we received many compliments from fellow spa-goers.

Here’s the sauna hat pattern, with instructions included on the inside of the main pattern piece.

BEWARE: You’ll want to be sure to print this at 100% rather than letting your system scale it accordingly.

The Hanging Loop pattern shape should measure exactly 1×4 inches.

This is my first pattern, and I’m not an expert seamstress, so maybe try a muslin before you cut into your good fabric!

Please use it responsibly.

©RoseanneS.Carrara,SmellingSaltsJournal

Enjoy your next Aufguss!


YOUR MAKES

A maker in Portland, Oregon sent me this lovely photo of the pair of sauna hats she made in Fall, 2025. She purchased her vibrant boiled wool from Stone Mountain & Daughter.

Responses to “DIY Sauna Hats [Free Pattern]”

  1. Jo wells Avatar
    Jo wells

    Thank you for the pattern! I’m going to make 2 at the request of my son and son in law!!

    1. Roseanne Carrara Avatar
      Roseanne Carrara

      So glad to hear it! I hope they turn out welL!

  2. debra robbins Avatar
    debra robbins

    Gm can you sew this patern the old way by putting wrong sides together then top stitch thanks

    1. Roseanne Carrara Avatar
      Roseanne Carrara

      It’s designed for thick wools, but I don’t see why not. However, You’d have to add a seam allowance to the pattern, Debra. And it may be a little trickier to work with at the top!

  3. debra robbins Avatar
    debra robbins

    If not can you make one love the 4 panels hat super easy for my kids to make thanks again

  4. Laetitia Avatar
    Laetitia

    hi Roseanne- THANK YOU for sharing this pattern – i am about to make this and need to buy the thick felt – i think i have found some online, and it is sold in 60cm widths (0.5m, 1m etc) – if i only need 4 pieces cut out, do you think i can squeeze 4 out of a 50cm by 60cm piece? or will i need a full metre? (i hope this makes sense – sorry it’s in metric!)

    1. Roseanne S. Carrara Avatar
      Roseanne S. Carrara

      I think you probably could! The pattern prints onto an 8.5×11 sheet of paper. So, that’s less than 22×28 centimetres. Laid out 2×2 you’d have less than 44×56 cm. I don’t think that kind of felt has a selvedge!

      GOOD LUCK! SEND ME PICS! OR TAG ME ON INSTA @roseannecarrara 🙂

  5. Jan Avatar
    Jan

    Making one for my son and one for his wife. I bought a charcoal boiled wool and a forest green mostly wool and some cashmere. Are these hats supposed to be fairly thick? Doubling these wools up will certainly make pretty thick. My main concern is whether or not to wash the material before cutting the patterns. I assume at some point they will want to wash the hats and if not prewashed they would probably shrink. Any insight on this, would greatly be appreciated before I start cutting. Thank you.

    1. Roseanne S. Carrara Avatar
      Roseanne S. Carrara

      Hi Jan! If your wool is very thick, you do not need to double up the fabric. My boiled wool was rather thin, so I did so. Sauna hats can be thicker or thinner as you please. I do not believe I washed my boiled wool before constructing. But I have since washed my sauna hat (in cold water only) and allowed to hang dry/air dry with no shrinkage. I would check with the manufacturer of your fabric on their care instructions. Or treat it as one would any lovely cashmere or merino and wash cold/hang dry. Best of luck!

      1. Jan Avatar
        Jan

        Thank you for the pattern and your quick reply. will start the project tomorrow.

  6. Roxanne Avatar

    Hi there! Just confirming this pattern can be made with a 1/2 yard of fabric (that is 50″ wide)?

    1. Roseanne S. Carrara Avatar
      Roseanne S. Carrara

      Yes! The pattern prints on an 8.5×11 in page, and you cut four (or 8) of the bells (if layering), which may be laid on the fabric top up/top down to minimize fabric consumption. So a 50×18 piece of fabric should be great. (44×9 yardage) x 2 = 8 bells

  7. Elle Hocking Avatar
    Elle Hocking

    thankyou! i made 1 for a friends bday last minute this morning before their birthday a birthday sauna session in Western Australia. they loved in on their baud head. CHEERS!

    1. Roseanne S. Carrara Avatar
      Roseanne S. Carrara

      WONDERFUL!!!!!!

  8. Emily Avatar
    Emily

    Thank you so much for this. It was my first go ever using a sewing machine, which was tricky with the thickness of the material, but I’m really happy with the (slightly messy) result! Great pattern 🙂

  9. Joe Avatar
    Joe

    I used 3mm material from Wool Felt company (UK) and they turned out really well – thank you! (Also my first proper go with a machine) Snapped a needle when trying to sew the edges on top of one another down one side, but this was no issue for a size 100 needle – thickest I could find in the shop.

    1. Roseanne S. Carrara Avatar
      Roseanne S. Carrara

      Fabulous, Joe!

  10. olivia Avatar
    olivia

    Thank you for sharing this pattern.

Leave a Reply

Your email address will not be published. Required fields are marked *